Industry Experience
Industry Experience

Senior Design Project
Technical Packet and Prototype Production Project
AT 670: Pre-Production Technologies: The objective of this assignment was to create a mini collection consisting of at least four athleisure looks. With the assistance of digital technologies, including 2D and 3D OptiTex, and Digital Fabric Printing, I had to create 3D prototypes for three looks and develop tech-packs and a physical prototype for at least one look. The design theme was given to us by Academy Sports + Outdoor and was "athleisure with an emphasis on sustainability" for Fall 2021. The course started with everyone in the class proposing their unique project, and then the technical design team of Academy, along with the Fashion professors of K-State, selected their top 4 proposals to be team leads. My proposal was one of the ones selected, so I led a group of two other students in creating this project. Below is my design process from initial market selection and research, all the way to the final prototype construction and marketing.


For my project I chose to target plus size women who are age 40+. I chose this market because I feel that it is often underserved in the current fashion industry, yet is one of the largest markets out there. I believe my collection is attractive to this target market because I designed the collection with their specific needs in mind.

Target Market Selection and Research
As a part of our initial research we created a survey which was then shared on social media, where we asked consumers in our market a variety of questions regarding their experience shopping for athleisure wear and their preferences. One of the questions was “what does your fitness routine look like?" 37% responded high intensity/cardio and 35% responded walking/low impact. This told us that our collection should feature garments that could work in both functions while still providing coverage and support. Another question was "what kind of athleisure wear do you typically buy or wear?" The most popular responses included leggings, sports bras, sweatshirts, padded bra tanks, and capris.

Color Story
I chose to use the original color story that was given to our class by the technical design team of Academy Sports + Outdoors.

Initial Theme Board
Based on our research, I further developed the collection by creating this theme board and writing the below design theme statement.
Our theme is empowering women through comfort and mobility. Our goal is to create stylish, sustainable, and functional pieces that will fit into the wardrobe of a mature woman who is plus size. We feel that this market is underserved and deserves to have stylish clothing that they feel comfortable and confident wearing to any occasion.

Our theme was athleisure wear with an emphasis on sustainability and one way that we promoted this was through the use of natural and recycled fibers and fabrics.
Textiles and Prints

I designed 3 different prints for this collection, with 3 to 4 different colorways each. Our final four looks all feature the same print in the same colorway to create a sense of unity, but any print in any colorway could be put in its place.

Sketches

The next step in the process was to sketch different designs so that we could analyze where we wanted our collection to go and narrow them down before editing our final 4. These were our initial sketches. I designed looks 6, 7, 8, and 9. Within our collections, we wanted there to be garments that would be considered more traditional athletic wear as well as garments that are more dressy but still athleisure.
Based on feedback from the Academy Sports + Outdoor team, our professor, and further market research, we narrowed down and updated the collection to these 4 looks. The looks chosen were designs 2, 6, 4, and 3.

Technical Flats


Technical flats were then made for the 3 looks that we decided to pattern and 3D construct in OptiTex. The flats were created in Adobe Illustrator. The flats convey all design details on both the front and the back of the garment. Callouts are featured within the tech packs on the garment that was chosen for physical prototyping.
Technical Package
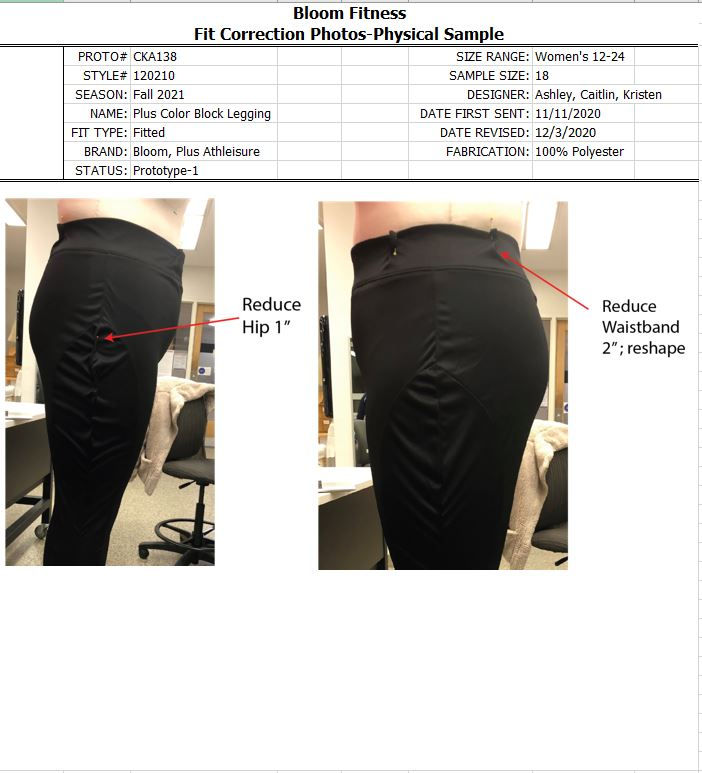
The next part the project was to make a tech pack for each garment that was being made into a prototype. Each tech pack has a construction page with seam, stitch and construction details and a garment POM page with the measurement procedure determined, and a fitting history page with the actual measurements of our virtual and physical fit sessions.
Please Click on the image in order to see all of the information on each page, or export the Excel file below.
Legging Tech Pack


Excel Copy of Legging Tech Pack
Sports Bra Tech Pack


Excel Copy of Sports Bra Tech Pack
OptiTex
I then developed a size 18 knit sloper for my team so that we could each manipulate it into the designs we chose to virtually render in OptiTex. This is an image of the patterns that I made for the garment that was chosen to be made into a physical prototype. All pattern information is included on each pattern including pattern name, materials, number to be cut, notches, and other related pattern properties.

I then virtually stitched the pattern pieces together in OptiTex to create the 3D simulation you see to the right. The form that is shown is an Alvanon size 18 which was very similar in measurements to the one that was in the studio, which is what was used for the physical prototype. This allowed my team to do our first set of fittings and pattern corrections all virtually, eliminated the extra time and resources it would have taken to do a physical sample. Within 3D OptiTex, I gained experience working with variance and articles to texture map our pieces, adding a zipper seam type to the rendering, and adding stitching. Within my Tech Pack, you can see how the virtual fitting went and what changes were made to the patterns before making them into the first physical sample. The other two ensembles were also patterned and 3D stitched in Optitex. Those are shown below.


Fabric Digital Printing
One of the requirements of the physical prototype was to digitally print fabric. My team and I digitally printed our fabric through Spoonflower.com. With this technology we designed an original print making sure that it gave a clean repeat. We then uploaded the image onto the website and selected the type of fabric we wanted for our final prototype and then had it digitally printed. This technology allowed us to really have our designs come to life because we could use the exact print that we used in our sketches and 3D renderings on our final prototype. Through this process, we learned that having a two-directional print would allow us to utilize fabric more effectively which brought our costs down.


Tags and Care Label
Within the Tech Pack of each garment, a set of labels were required that listed the country of origin, fabric content, care, size, and company. My team and I decided to actually make these labels and include them in our physical prototype. We also created hang tags that featured our brand's logo and information that would typically be found on a hangtag.


Final Physical Prototype
After making a mockup in similar fabric (see fit history in tech packs) the patterns were corrected in OptiTex. The corrected patterns were then arranged in a way that would fit the plotted printer while utilizing the paper in the most efficient way. Once the patterns were plotted, I exported them to Adobe Illustrator and then converted them to a PDF so that the printer could properly read the file. The patterns were then printed and cut. The final prototype was then constructed using the digitally printed fabric. This process was going on during a time of restricted studio access due to Covid19, so our physical prototype was constructed in 2 days. I felt the most comfortable using the industrial sewing machines in the studio, so I did most of the garment construction for my group. Although my team and I had a very short time frame to construct this garment we feel that it turned out great and reflects our original design well!


